# 定位元素
有许多QML元素用于定位项,被称为定位器。其中Qt Quick模块提供了以下定位器:Row、Column、Grid 和 Flow。在下面描述了相同内容的不同效果。
提示
在详细介绍之前,介绍一些辅助元素:红色、蓝色、绿色、浅色和深色方块。 这些组件中的每一个都包含一个48x48像素的彩色矩形。 作为参考,这里是RedSquare的源代码:
// RedSquare.qml

import QtQuick

Rectangle {
    width: 48
    height: 48
    color: "#ea7025"
    border.color: Qt.lighter(color)
}请注意,使用Qt.lighter(color)来根据填充颜色生成较浅的边框颜色。 将在接下来的示例中使用这些帮助元素来使源代码更加紧凑和可读。 请记住,每个矩形最初都是48x48像素。
Column元素通过将子项堆叠在一起将它们排列成一列。 spacing属性可用于将每个子元素彼此间隔开。

// ColumnExample.qml

import QtQuick

DarkSquare {
    id: root
    width: 120
    height: 240

    Column {
        id: row
        anchors.centerIn: parent
        spacing: 8
        RedSquare { }
        GreenSquare { width: 96 }
        BlueSquare { }
    }
}Row元素将其子项彼此相邻放置;具体从左到右,还是从右到左,取决于layoutDirection属性。 同样,spacing用于分隔子项。

// RowExample.qml

import QtQuick

BrightSquare {
    id: root
    width: 400; height: 120

    Row {
        id: row
        anchors.centerIn: parent
        spacing: 20
        BlueSquare { }
        GreenSquare { }
        RedSquare { }
    }
}Grid元素将其子项排列在网格中。 通过设置rows和columns属性可以限制行数或列数。 如果只设置它们中的一个参数,另一个参数会根据子项数量来计算。 例如,将行设置为3并添加6个子项,将导致呈现2列。 属性flow和layoutDirection用于控制项添加到网格的顺序,而spacing控制分隔子项的空间距离。

// GridExample.qml

import QtQuick

BrightSquare {
    id: root
    width: 160
    height: 160

    Grid {
        id: grid
        rows: 2
        columns: 2
        anchors.centerIn: parent
        spacing: 8
        RedSquare { }
        RedSquare { }
        RedSquare { }
        RedSquare { }
    }

}最终的定位器是Flow,它将其子项添加到流中。 使用flow和layoutDirection控制流的方向。 它可以横向流动,或从顶部到底部流动。 它也可以从左到右流动,或在相反的方向流动。 当项目添加到流中时,它们会根据需要被包装形成新的行或列。 为了使流起作用,它必须具有宽度或高度。 这可以直接设置,也可以通过锚布局设置。

// FlowExample.qml

import QtQuick

BrightSquare {
    id: root
    width: 160
    height: 160

    Flow {
        anchors.fill: parent
        anchors.margins: 20
        spacing: 20
        RedSquare { }
        BlueSquare { }
        GreenSquare { }
    }
}经常与定位器一起使用的元素是Repeater(重复器)。 它的工作方式类似于for循环,并在模型上进行迭代。 在最简单的情况下,模型只是一个提供了不断循环数的值。
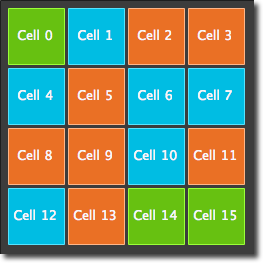
// RepeaterExample.qml

import QtQuick

DarkSquare {
    id: root
    width: 252
    height: 252
    property variant colorArray: ["#00bde3", "#67c111", "#ea7025"]

    Grid{
        anchors.fill: parent
        anchors.margins: 8
        spacing: 4
        Repeater {
            model: 16
            delegate: Rectangle {
                required property int index
                property int colorIndex: Math.floor(Math.random()*3)

                width: 56; height: 56
                color: root.colorArray[colorIndex]
                border.color: Qt.lighter(color)

                Text {
                    anchors.centerIn: parent
                    color: "#f0f0f0"
                    text: "Cell " + parent.index
                }
            }
        }
    }
}
在这个重复器的示例中,使用了一些新的内容。 定义了自己的colorArray属性,它是一个颜色数组。 重复器创建一系列矩形(16 个,由模型定义)。 对于每个循环,它创建由重复器的子节点定义的矩形。 在矩形中,使用JS数学函数选择颜色:Math.floor(Math.random()*3)。 这提供了一个范围为0到2的随机数,用它来从颜色数组中选择颜色。 如前所述,JavaScript是Qt Quick的核心部分,因此可以使用标准库。
重复器将index属性注入到自身。 它包含当前循环的索引(0,1,..15)。 可以使用它根据索引做出特定的决策,或者在例子中使用Text元素可视化当前索引。
提示
虽然index属性是动态注入到Rectangle中的,但将其声明为必需属性是增强可读性和帮助工具的一个很好做法。 这是通过required property int index这行实现的。
提示
更大模型的高级处理和动态视图的动态代理将在模型视图章节中介绍。 当需要呈现少量静态数据时,最好使用重复器。