# 动画
动画应用于属性改变。 动画定义了属性值从一个值到另一个值改变时的插值曲线。 这些动画曲线创建从一个值到另一个值的平滑过渡。
动画由一系列要设置动画的目标属性、插值曲线的缓动曲线和持续时间定义。 Qt Quick中的所有动画都由同一个计时器控制,因此是同步的。 这提高了动画的性能和视觉质量。
动画使用插值控制属性如何变化
这是一个基本概念。 QML是基于元素、属性和脚本的。 每个元素都提供了几十个属性,每个属性都可以应用动画。 在本书中,将看到一个非常广泛的应用。
会发现看一些动画时,会欣赏到它们的美丽,以及创意天才。 请记住:动画控制属性更改,每个元素都有数十个属性供使用。
让我们解锁这种力量吧!
// AnimationExample.qml

import QtQuick

Image {
    id: root
    source: "assets/background.png"

    property int padding: 40
    property int duration: 4000
    property bool running: false

    Image {
        id: box
        x: root.padding;
        y: (root.height-height)/2
        source: "assets/box_green.png"

        NumberAnimation on x {
            to: root.width - box.width - root.padding
            duration: root.duration
            running: root.running
        }
        RotationAnimation on rotation {
            to: 360
            duration: root.duration
            running: root.running
        }
    }

    MouseArea {
        anchors.fill: parent
        onClicked: root.running = true
    }
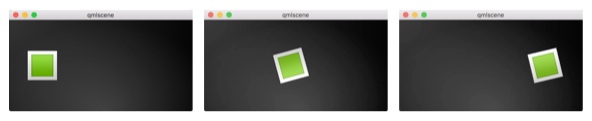
}上面的例子展示了一个应用于x和rotation属性的简单动画。 每个动画的持续时间为4000毫秒(msec)并且永远循环。 x上的动画将对象的x坐标逐渐移动到240px。rotation旋转动画从当前角度转到360度。 两个动画并行运行,并在UI加载后立即启动。
可以通过更改to和duration属性播放动画,或者可以添加另一个动画(例如,在opacity属性甚至scale属性上添加动画)。 将这些结合起来,看起来就像物体正在消失在深空中。 试试看!
# 动画元素
存在多种类型的动画元素,每种都针对特定用例进行了优化。 以下是最重要的动画列表:
PropertyAnimation(属性动画) - 属性值变化的动画NumberAnimation(数值动画) - 实数类型值改变的动画ColorAnimation(颜色动画) - 颜色值改变的动画RotationAnimation(旋转动画) - 旋转值改变的动画
除了这些基本且广泛使用的动画元素外,Qt Quick还为某些特定用例提供了更专业的动画:
PauseAnimation(暂停动画) - 为动画提供暂停SequentialAnimation(顺序动画) - 允许动画按顺序运行ParallelAnimation(并行动画) - 允许动画并行执行AnchorAnimation(锚点动画) - 锚点值变化的动画ParentAnimation(父值动画) - 父元素变化的动画SmoothedAnimation(平滑动画) - 运行属性平滑地跟踪一个值的动画SpringAnimation(弹簧动画) - 允许属性跟踪一个类似弹簧的运动的值的动画PathAnimation(路径动画) - 项沿着一个路径的动画Vector3dAnimation(三维点变化动画) - QVector3d值变化的动画
稍后将学习如何创建动画序列。 在处理更复杂的动画时,有时需要更改属性或在正在运行动画的期间运行脚本。 为此,Qt Quick提供了动作元素,可以在可以使用其他动画元素的任何地方使用这些元素:
PropertyAction(属性动作) - 指定在动画期间直接改变属性ScriptAction(脚本动作) - 定义在动画期间运行的脚本
本章将使用小的、重点突出的示例讨论主要的动画类型。
# 应用动画
动画可以通过多种方式应用:
Animation on property(属性上动画) - 在元素完全加载后自动运行
Behavior on property(行为上动画) - 当属性值改变时自动运行
Standalone Animation(独立动画) - 当动画使用
start()或将running设置为true(例如通过属性绑定)时显式启动运行
稍后还将看到如何在状态转换中使用动画。
# 可点击图像 二版
为了演示动画的使用,重用了前一章中的可点击图像(ClickableImage)组件,并使用文本元素对其进行了扩展。
// ClickableImageV2.qml
// Simple image which can be clicked

import QtQuick

Item {
    id: root
    width: container.childrenRect.width
    height: container.childrenRect.height
    property alias text: label.text
    property alias source: image.source
    signal clicked

    Column {
        id: container
        Image {
            id: image
        }
        Text {
            id: label
            width: image.width
            horizontalAlignment: Text.AlignHCenter
            wrapMode: Text.WordWrap
            color: "#ececec"
        }
    }

    MouseArea {
        anchors.fill: parent
        onClicked: root.clicked()
    }
}
为了组织图像下方的元素,使用了Column(列)定位器,并根据列的childrenRect属性计算了宽度和高度。 它公开了文本属性和图像源属性,以及一个点击信号;还希望文本与图像一样宽,并使其换行,通过使用Text元素的wrapMode属性来实现换行。
父/子项几何形状依赖
由于几何形状依赖的倒置(父元素的几何形状依赖于子元素的),不能在ClickableImageV2上设置width/height,因为这会破坏width/height 绑定。
如果当前项更像是其他项的容器,则应该适应父项(即,当前项)的几何形状,应该倾向于使子项的几何外形依赖于父项的。
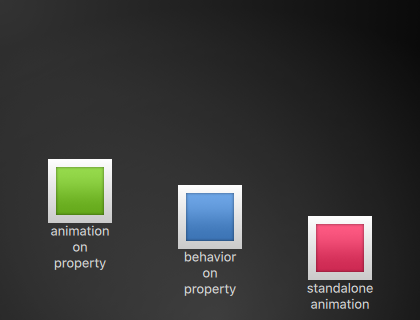
# 对象升序排列
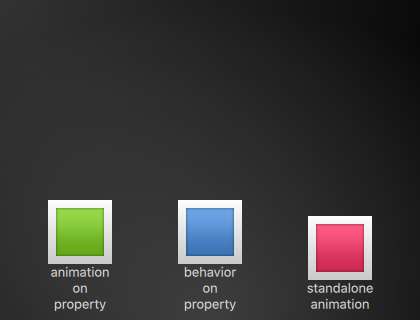
这三个对象都在相同的y位置(y=200)。他们都需要前往y=40位置,他们每个都使用了具有不同的副作用和特征的方法。
# 第一个对象
第一个对象使用 Animation on <property> 策略移动,动画立即开始。
ClickableImageV2 {
    id: greenBox
    x: 40; y: root.height-height
    source: "assets/box_green.png"
    text: qsTr("animation on property")
    NumberAnimation on y {
        to: 40; duration: 4000
    }
}
单击对象时,其y位置将重置为起始位置,这适用于所有对象。 在第一个对象上,只要动画正在运行,重置就不会产生任何影响。
这可能会造成视觉干扰,因为在动画开始前的几分之一秒内,y位置被设置为新值。 此类竞争性属性更改应避免。
译者注释:有关动画中持有的临时位置
在这三个子项的父项中有如下的代码,也就是在单击其他区域的时候,会将这三个对象的y重置到原始位置:
MouseArea {
    anchors.fill: parent
    onClicked: {
        greenBox.y = blueBox.y = redBox.y = 205
    }
}
在第一个对象上进行测试,刚加载完页面开始出现动画。在移动的过程中,点击页面的其余区域,动画还是沿着原来的位置运动;但是在单击的同时,会在原始位置闪烁;但是闪烁过后又会按着原来的位置继续向上行走。从观察的结果上看,虽然这个对象的位置变量被影响了,动画里面使用的临时变量是没有被影响;对象上的实际位置是全局点击事件与动画中持有位置变量的实时影响。
其他地方改变了对象的位置,不会影响到动画里面的持有位置的变量。
# 第二个对象
第二个对象使用Behavior on动画移动。 此行为告诉属性它应该为值的每个更改设置动画,可以通过在 Behavior 元素上设置 enabled: false 来禁用该行为(动画)。
ClickableImageV2 {
    id: blueBox
    x: (root.width-width)/2; y: root.height-height
    source: "assets/box_blue.png"
    text: qsTr("behavior on property")
    Behavior on y {
        NumberAnimation { duration: 4000 }
    }

    onClicked: y = 40
    // random y on each click
    // onClicked: y = 40 + Math.random() * (205-40)
}
当单击该对象(然后将其y位置设置为40)时,该对象将开始移动。 再次单击没有影响,因为位置已经设置。
可以尝试对y位置使用随机值(例如40 + (Math.random() * (205-40))。将看到对象将始终动画到新位置,并调整其移动速度将动画持续时间与定义的目标时间4秒相匹配。
# 第三个对象
第三个对象使用独立动画。 动画将自己定义成独立元素,几乎可以定义在文档中的任何地方。
ClickableImageV2 {
    id: redBox
    x: root.width-width-40; y: root.height-height
    source: "assets/box_red.png"
    onClicked: anim.start()
    // onClicked: anim.restart()

    text: qsTr("standalone animation")

    NumberAnimation {
        id: anim
        target: redBox
        properties: "y"
        to: 40
        duration: 4000
    }
}单击时将使用动画的start()函数启动动画。 每个动画都有start()、stop()、resume()和restart()函数。 动画本身比之前的其他动画类型包含更多的信息。
需要定义target,它是动画作用到的元素,以及想要动画的属性properties的名称。 还需要定义一个to值;在定义一个 from 值的情况下,它允许重新启动动画。
单击背景会将所有对象重置到其初始位置。 除非重新启动触发元素重新加载的程序,否则无法重新启动第一个对象的动画。
控制动画的其他方法
启动/停止动画的另一种方法是将属性绑定到动画的 running 属性。 当用户输入作为控制属性时,这尤其有用:
NumberAnimation {
    // [...]
    // animation runs when mouse is pressed
    // 当鼠标按下的时候运行
    running: area.pressed
}
MouseArea {
    id: area
}
# 缓动曲线
属性值的变化可以由动画控制。 缓动属性允许影响属性值变化的插值曲线。
因为动画的初始缓动类型是Easing.Linear,因此现在定义的所有动画都使用线性插值。 最好用一个小绘图进行可视化,其中y轴是要被动画的属性,x轴是时间(持续时间)。 线性插值将从动画开始时的from值到动画结束时的to值之间绘制一条直线。 缓动类型定义了变化曲线。
应仔细选择缓动类型以支持移动对象的自然拟合。 例如,当一个页面滑出时,页面应该首先缓慢滑出,然后获得动力最终高速滑出,类似于翻书。
动画不应该被过度使用
与UI设计的其他方面一样,动画应该仔细设计以支持UI流,而不是使它处于重要位置。 眼睛对移动的物体非常敏感,动画很容易分散用户的注意力。
在下一个示例中将尝试一些缓动曲线。 每条缓动曲线都由一个可点击的图像显示,单击时,将在square动画上设置新的缓动类型,然后触发restart()以使用新曲线运行动画。
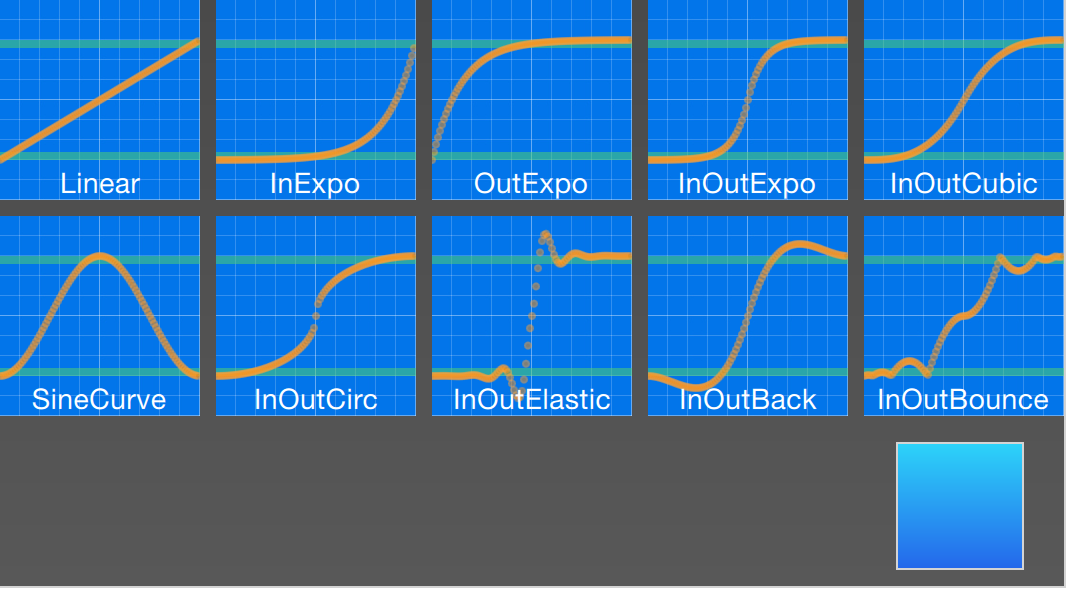
这个例子的代码有点复杂。 首先创建一个由EasingTypes组成的网格和一个被缓动类型控制的Box(方框)。 缓动类型仅显示方框将要使用的动画曲线。 当用户单击缓动曲线时,方框会根据缓动曲线向一个方向移动。 动画本身是一个独立动画,目标设置为方框,属性配置为x属性动画,持续时间为2秒。
提示
EasingType的内部是实时渲染曲线的,有兴趣的读者可以在EasingCurves示例中查找。
// EasingCurves.qml

import QtQuick
import QtQuick.Layouts

Rectangle {
    id: root
    width: childrenRect.width
    height: childrenRect.height

    color: '#4a4a4a'
    gradient: Gradient {
        GradientStop { position: 0.0; color: root.color }
        GradientStop { position: 1.0; color: Qt.lighter(root.color, 1.2) }
    }

    ColumnLayout {
        Grid {
            spacing: 8
            columns: 5
            EasingType {
                easingType: Easing.Linear
                title: 'Linear'
                onClicked: {
                    animation.easing.type = easingType
                    box.toggle = !box.toggle
                }
            }
            EasingType {
                easingType: Easing.InExpo
                title: "InExpo"
                onClicked: {
                    animation.easing.type = easingType
                    box.toggle = !box.toggle
                }
            }
            EasingType {
                easingType: Easing.OutExpo
                title: "OutExpo"
                onClicked: {
                    animation.easing.type = easingType
                    box.toggle = !box.toggle
                }
            }
            EasingType {
                easingType: Easing.InOutExpo
                title: "InOutExpo"
                onClicked: {
                    animation.easing.type = easingType
                    box.toggle = !box.toggle
                }
            }
            EasingType {
                easingType: Easing.InOutCubic
                title: "InOutCubic"
                onClicked: {
                    animation.easing.type = easingType
                    box.toggle = !box.toggle
                }
            }
            EasingType {
                easingType: Easing.SineCurve
                title: "SineCurve"
                onClicked: {
                    animation.easing.type = easingType
                    box.toggle = !box.toggle
                }
            }
            EasingType {
                easingType: Easing.InOutCirc
                title: "InOutCirc"
                onClicked: {
                    animation.easing.type = easingType
                    box.toggle = !box.toggle
                }
            }
            EasingType {
                easingType: Easing.InOutElastic
                title: "InOutElastic"
                onClicked: {
                    animation.easing.type = easingType
                    box.toggle = !box.toggle
                }
            }
            EasingType {
                easingType: Easing.InOutBack
                title: "InOutBack"
                onClicked: {
                    animation.easing.type = easingType
                    box.toggle = !box.toggle
                }
            }
            EasingType {
                easingType: Easing.InOutBounce
                title: "InOutBounce"
                onClicked: {
                    animation.easing.type = easingType
                    box.toggle = !box.toggle
                }
            }
        }
        Item {
            height: 80
            Layout.fillWidth: true
            Box {
                id: box
                property bool toggle
                x: toggle ? 20 : root.width - width - 20
                anchors.verticalCenter: parent.verticalCenter
                gradient: Gradient {
                    GradientStop { position: 0.0; color: "#2ed5fa" }
                    GradientStop { position: 1.0; color: "#2467ec" }
                }
                Behavior on x {
                    NumberAnimation {
                        id: animation
                        duration: 500
                    }
                }
            }
        }
    }
}
请尝试这个例子并观察在动画过程中速度的变化。 有些动画让人感觉更自然,有些则让人感到恼火。
除了duration和easing.type,你还可以微调动画。 例如,一般的 PropertyAnimation 类型(大多数动画都继承自该类型)额外支持 easing.amplitude、easing.overshoot 和 easing.period 属性,它们允许微调特定缓动曲线的行为。
并非所有缓动曲线都支持这些参数。 请查阅PropertyAnimation文档中的缓动表(easing table) (opens new window)以检查缓动参数是否对缓动曲线有影响。
选择正确的动画
为用户界面上下文中的元素选择正确的动画对结果至关重要。 请记住动画应支持UI流,不要激怒用户。
# 分组动画
通常多个动画会比仅仅为一个属性设置动画更复杂。 可能希望同时或依次运行多个动画,甚至在两个动画之间执行脚本。
为此,可以使用分组动画。 顾名思义,可以对动画进行分组。 可以通过两种方式进行分组:并行或串行。 可以使用SequentialAnimation(串行动画)或ParallelAnimation(并行动画)元素,让它们充当其他动画元素的动画容器。 这些分组动画本身就是动画,可以完全如此使用。

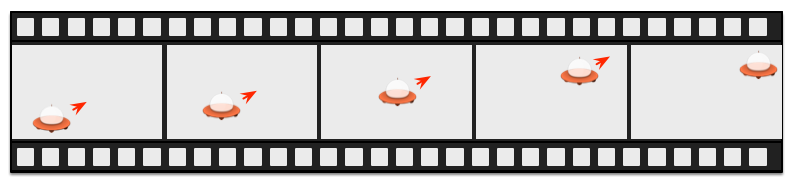
# 并行动画
并行动画的所有直接子动画开始后并行运行,这允许同时为不同的属性设置动画。
// ParallelAnimationExample.qml
import QtQuick

BrightSquare {
    id: root

    property int duration: 3000
    property Item ufo: ufo

    width: 600
    height: 400

    Image {
        anchors.fill: parent
        source: "assets/ufo_background.png"
    }

    ClickableImageV3 {
        id: ufo
        x: 20; y: root.height-height
        text: qsTr('ufo')
        source: "assets/ufo.png"
        onClicked: anim.restart()
    }

    ParallelAnimation {
        id: anim
        NumberAnimation {
            target: ufo
            properties: "y"
            to: 20
            duration: root.duration
        }
        NumberAnimation {
            target: ufo
            properties: "x"
            to: 160
            duration: root.duration
        }
    }
}
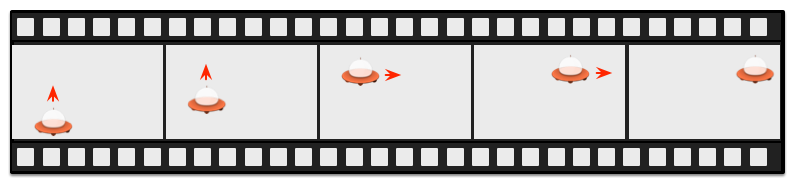
# 串行动画
串行动画按照声明的顺序执行每个子动画:从上到下。
// SequentialAnimationExample.qml
import QtQuick

BrightSquare {
    id: root

    property int duration: 3000
    property Item ufo: ufo

    width: 600
    height: 400

    Image {
        anchors.fill: parent
        source: "assets/ufo_background.png"
    }

    ClickableImageV3 {
        id: ufo
        x: 20; y: root.height-height
        text: qsTr('rocket')
        source: "assets/ufo.png"
        onClicked: anim.restart()
    }

    SequentialAnimation {
        id: anim
        NumberAnimation {
            target: ufo
            properties: "y"
            to: 20
            // 60% of time to travel up
            duration: root.duration * 0.6
        }
        NumberAnimation {
            target: ufo
            properties: "x"
            to: 400
            // 40% of time to travel sideways
            duration: root.duration * 0.4
        }
    }
}
# 嵌套动画
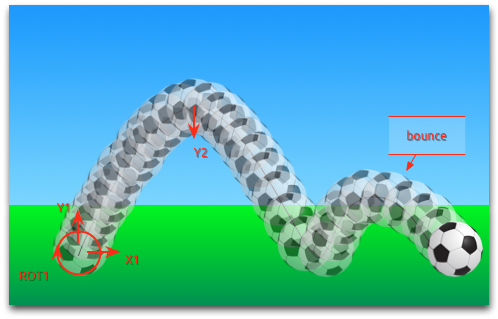
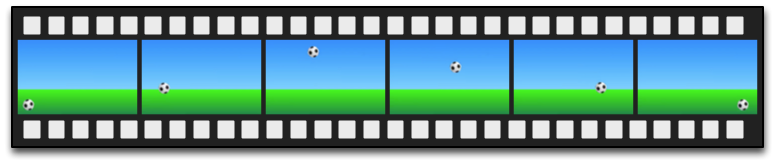
分组动画也可以嵌套。 例如,一个串行动画可以有两个并行动画作为子动画,等等。 可以用一个足球的例子来形象介绍。 示例是从左到右抛出一个球并为其行为设置动画。

要理解动画,我们需要将运动分解成对象的积分变换。 需要记住动画会为属性值的改变设置动画,由以下是不同的转换组成:
从左到右的x平移(
X1)从下到上的y平移(
Y1),然后是从上到下的y平移(Y2),并带有一些弹跳在整个动画持续时间内旋转360度(
ROT1)
动画的整个持续时间应该花费三秒钟。
以一个空的Item作为根元素,设置宽为480、高为300。
import QtQuick

Item {
    id: root

    property int duration: 3000

    width: 480
    height: 300

    // [...]
}
已经定义了总的动画持续时间作为参考,以更好地同步不同动画部分。
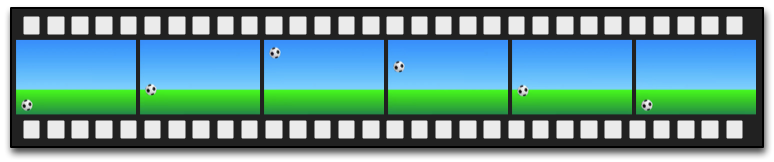
下一步是添加背景,在例子中是2个带有绿色和蓝色的渐变矩形。
Rectangle {
    id: sky
    width: parent.width
    height: 200
    gradient: Gradient {
        GradientStop { position: 0.0; color: "#0080FF" }
        GradientStop { position: 1.0; color: "#66CCFF" }
    }
}
Rectangle {
    id: ground
    anchors.top: sky.bottom
    anchors.bottom: root.bottom
    width: parent.width
    gradient: Gradient {
        GradientStop { position: 0.0; color: "#00FF00" }
        GradientStop { position: 1.0; color: "#00803F" }
    }
}
上方的蓝色矩形占据总高度中的200个像素,下方的矩形锚定在天空的底部和根元素的底部。
把足球带到绿色部分上。 球是一个图像,存储在“assets/soccer_ball.png”。 一开始,把它放在左下角,靠近边缘。
Image {
    id: ball
    x: 0; y: root.height-height
    source: "assets/soccer_ball.png"

    MouseArea {
        anchors.fill: parent
        onClicked: {
            ball.x = 0
            ball.y = root.height-ball.height
            ball.rotation = 0
            anim.restart()
        }
    }
}
该图像附有一个鼠标区域。 如果点击球,球的位置将重置并重新开始动画。
先从两个y平移的串行动画开始。
SequentialAnimation {
    id: anim
    NumberAnimation {
        target: ball
        properties: "y"
        to: 20
        duration: root.duration * 0.4
    }
    NumberAnimation {
        target: ball
        properties: "y"
        to: 240
        duration: root.duration * 0.6
    }
}
这指定总动画持续时间的40%是向上运行的动画,60%是向下运动,每个动画依次运行。 变换只是在线性路径上执行动画,目前没有曲线路径。 稍后将使用缓动曲线添加曲线,目前我们专注于为此变换设置动画。
接下来,需要添加x平移。 x平移应与y平移是并行运行,因此我们需要将y平移序列与x平移一起封装在并行动画中。
ParallelAnimation {
    id: anim
    SequentialAnimation {
        // ... our Y1, Y2 animation
    }
    NumberAnimation { // X1 animation
        target: ball
        properties: "x"
        to: 400
        duration: root.duration
    }
}
最后,希望球能旋转。 为此,需要向并行动画中添加另一个RotationAnimation动画,它专门用于旋转。
ParallelAnimation {
    id: anim
    SequentialAnimation {
        // ... our Y1, Y2 animation
    }
    NumberAnimation { // X1 animation
        // X1 animation
    }
    RotationAnimation {
        target: ball
        properties: "rotation"
        to: 720
        duration: root.duration
    }
}
这就是整个动画序列。 剩下的一件事是为球的运动提供正确的缓动曲线。 对于Y1动画,使用Easing.OutCirc曲线,因为它看起来更像是一个圆周运动;Y2使用Easing.OutBounce增强;让球弹跳,弹跳应该发生在最后(尝试使用 Easing.InBounce,会看到弹跳立即开始)。
X1 和 ROT1 动画保持原来的线性曲线。
这是最终的动画代码,供您参考:
ParallelAnimation {
    id: anim
    SequentialAnimation {
        NumberAnimation {
            target: ball
            properties: "y"
            to: 20
            duration: root.duration * 0.4
            easing.type: Easing.OutCirc
        }
        NumberAnimation {
            target: ball
            properties: "y"
            to: root.height-ball.height
            duration: root.duration * 0.6
            easing.type: Easing.OutBounce
        }
    }
    NumberAnimation {
        target: ball
        properties: "x"
        to: root.width-ball.width
        duration: root.duration
    }
    RotationAnimation {
        target: ball
        properties: "rotation"
        to: 720
        duration: root.duration
    }
}