# 网络套接字
WebSockets模块为WebSockets客户端和服务器提供了WebSockets协议的实现,它镜像了Qt CPP模块内容。 它允许使用全双工通信通道发送字符串和二进制消息。 WebSocket通常是通过与服务器建立HTTP连接来建立连接的,然后服务器将连接“升级”为WebSocket连接。
在Qt/QML中,还可以简单地使用WebSocket和WebSocketServer对象来创建直接WebSocket连接。 WebSocket协议使用“ws”URL模式或使用“wss”进行安全连接。
可以通过先导入web socket qml模块来使用它。
import QtWebSockets

WebSocket {
    id: socket
}
# WS服务器
可以使用Qt WebSocket的C++部分轻松创建自己的WS服务器,也可以使用其他不同的WS实现,这非常有趣。 这样做有趣的原因是,它允许将QML的惊人渲染质量与扩展的Web应用程序服务器连接起来。 在此示例中,将使用使用基于Node JS的Web套接字服务器的ws (opens new window)模块。 为此,首先需要安装node js (opens new window);然后,创建一个ws_server文件夹,并使用节点包管理器(npm)安装ws包。
该代码将在NodeJS中创建一个简单的回显服务器,以将相同的消息回复到QML客户端。

cd ws_server
npm install ws
npm工具将ws包及其依赖项下载并安装到本地文件夹中。
server.js文件将是服务器的实现。 服务器代码将在端口3000上创建一个Web套接字服务器并侦听传入的连接。 在传入的连接上,它将发送问候语并等待客户端的消息。 客户端在套接字上发送的每条消息都将会再被发送回客户端。
const WebSocketServer = require('ws').Server

const server = new WebSocketServer({ port : 3000 })

server.on('connection', function(socket) {
	console.log('client connected')
	socket.on('message', function(msg) {
		console.log('Message: %s', msg)
		socket.send(msg.toString())
	});
	socket.send('Welcome to Awesome Chat')
});

console.log('listening on port ' + server.options.port)
读者需要习惯JavaScript的表示方法和函数回调。
# WS客户端
在客户端,需要一个列表视图来显示消息和一个TextInput来供用户输入新的聊天消息。
将在此示例中使用白色标签(label)。
// Label.qml
import QtQuick

Text {
    color: '#fff'
    horizontalAlignment: Text.AlignLeft
    verticalAlignment: Text.AlignVCenter
}
聊天视图是一个列表视图,视图中文本追加到列表模型上。 每个条目都使用一行标签(label)显示前缀和消息。 使用单元格宽度cw因子将宽度分成24列。
// ChatView.qml
import QtQuick

ListView {
    id: root
    width: 100
    height: 62

    model: ListModel {}

    function append(prefix, message) {
        model.append({prefix: prefix, message: message})
    }

    delegate: Row {
        id: delegate

        required property var model
        property real cw: width / 24

        width: root.width
        height: 18

        Label {
            width: delegate.cw * 1
            height: parent.height
            text: delegate.model.prefix
        }

        Label {
            width: delegate.cw * 23
            height: parent.height
            text: delegate.model.message
        }
    }
}
聊天的输入只是使用一个带有彩色边框的简单文本输入框。
// ChatInput.qml
import QtQuick

FocusScope {
    id: root

    property alias text: input.text
    signal accepted(string text)

    width: 240
    height: 32

    Rectangle {
        anchors.fill: parent
        color: '#000'
        border.color: '#fff'
        border.width: 2
    }

    TextInput {
        id: input
        anchors.left: parent.left
        anchors.right: parent.right
        anchors.verticalCenter: parent.verticalCenter
        anchors.leftMargin: 4
        anchors.rightMargin: 4
        color: '#fff'
        focus: true
        onAccepted: function () {
            root.accepted(text)
        }
    }
}
当Web套接字接收到消息时,它会将消息附加到聊天视图。 这同样适用于状态的更改。 此外,当用户输入聊天消息时,消息副本会附加到客户端的聊天视图中,并将消息发送到服务器。
// ws_client.qml
import QtQuick
import QtWebSockets

Rectangle {
    width: 360
    height: 360
    color: '#000'

    ChatView {
        id: box
        anchors.left: parent.left
        anchors.right: parent.right
        anchors.top: parent.top
        anchors.bottom: input.top
    }

    ChatInput {
        id: input
        anchors.left: parent.left
        anchors.right: parent.right
        anchors.bottom: parent.bottom
        focus: true

        onAccepted: function(text) {
            print('send message: ' + text)
            socket.sendTextMessage(text)
            box.append('>', text)
            text = ''
        }
    }

    WebSocket {
        id: socket

        url: "ws://localhost:3000"
        active: true

        onTextMessageReceived: function (message) {
            box.append('<', message)
        }

        onStatusChanged: {
            if (socket.status == WebSocket.Error) {
                box.append('#', 'socket error ' + socket.errorString)
            } else if (socket.status == WebSocket.Open) {
                box.append('#', 'socket open')
            } else if (socket.status == WebSocket.Closed) {
                box.append('#', 'socket closed')
            }
        }
    }
}
需要先运行服务器,然后再运行客户端。 在此简单客户端中没有重试连接的机制。
运行服务器
cd ws_server
node server.js
运行客户端
cd ws_client
qml ws_client.qml
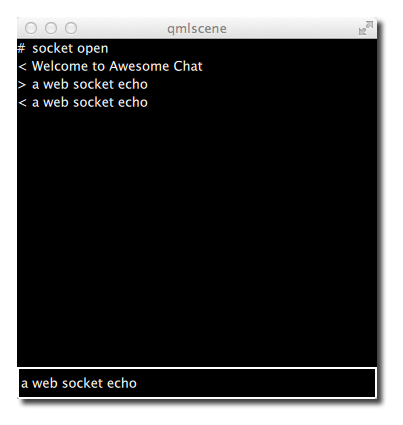
输入文本并按下Enter键时,应该会看到如下类似的内容。
