# 代理
在用户自定义的界面中使用模型和视图时,代理在创建外观和行为方面发挥着巨大作用。由于模型中的每个项都是通过代理进行可视化的,因此用户实际上看到的是代理。
每个代理都可以访问许多附加属性,它们一些来自数据模型,另一些来自视图。模型中,属性将每个项的数据传送给代理;视图中,属性传达与视图内的代理相关的状态信息。下面从视图深入了解属性。
最常用从视图附加来的属性是ListView.isCurrentItem和ListView.view。ListView.isCurrentItem是一个布尔值,指示该项是否是当前项;ListView.view是对实际视图的只读引用。通过访问视图,可以创建通用的、可重用的代理,以适配包含它们的视图的大小和性质。在下面的示例中,每个代理的width绑定到视图的width,而每个代理的背景color取决于附加的ListView.isCurrentItem属性。
import QtQuick

Rectangle {
    width: 120
    height: 300

    gradient: Gradient {
        GradientStop { position: 0.0; color: "#f6f6f6" }
        GradientStop { position: 1.0; color: "#d7d7d7" }
    }

    ListView {
        anchors.fill: parent
        anchors.margins: 20

        focus: true

        model: 100
        delegate: numberDelegate

        spacing: 5
        clip: true
    }

    Component {
        id: numberDelegate

        Rectangle {
            id: wrapper

            required property int index

            width: ListView.view.width
            height: 40

            color: ListView.isCurrentItem ? "#157efb" : "#53d769"
            border.color: Qt.lighter(color, 1.1)

            Text {
                anchors.centerIn: parent

                font.pixelSize: 10

                text: wrapper.index
            }
        }
    }
}
如果模型中的每个项目都与一个操作相关联(例如,单击一个项时对其进行操作),则该功能是代理的一部分。 这在处理视图中项目之间导航的视图和处理特定项目上的操作的委托之间划分了事件管理。这在视图和代理之间划分了事件管理,视图处理在视图中项目之间导航,代理处理特定项上的操作。
最基本的方法是在每个代理中创建一个MouseArea并根据onClicked信号进行操作。 这将在本章下一节的示例中演示。
# 给添加的和删除的项加上动画
在某些情况下,视图中显示的内容会随着时间变化。随着底层数据的模型的改变,项被添加和删除。在这些情况下,使用视觉提示通常是一个好主意,这能给用户体现数据趋势,并能够帮助用户了解到添加或者删除了那些数据。
非常方便的是,QML视图将onAdd和onRemove这两个信号附加到项目的代理上。 通过从这些信号触发动画,很容易创建必要的运动来帮助用户识别正在发生什么。
下面的示例通过动态填充ListModel来演示。 在屏幕底部,会显示一个用于添加新项目的按钮。 当它被点击时,使用append方法将一个新项目添加到模型中。 这会触发视图创建新的代理,并触发发射GridView.onAdd信号。 信号触发名为addAnimation的SequentialAnimation(顺序动画),通过对代理的scale属性进行动画处理,使项以从小放大方式添加到视图中。
GridView.onAdd: addAnimation.start()

SequentialAnimation {
    id: addAnimation
    NumberAnimation {
        target: wrapper
        property: "scale"
        from: 0
        to: 1
        duration: 250
        easing.type: Easing.InOutQuad
    }
}当点击视图中的代理时,通过调用remove方法该项目会被从模型中删除,这会导致发出GridView.onRemove信号,开始启动名为removeAnimation的SequentialAnimation(顺序动画)。 但是,这时必须将代理的销毁延迟到动画完成。 为此,使用PropertyAction元素在动画之前将GridView.delayRemove属性设置为true,在动画之后再设置为false,这确保在删除代理项之前能完成动画。
GridView.onRemove: removeAnimation.start()

SequentialAnimation {
    id: removeAnimation

    PropertyAction { target: wrapper; property: "GridView.delayRemove"; value: true }
    NumberAnimation { target: wrapper; property: "scale"; to: 0; duration: 250; easing.type: Easing.InOutQuad }
    PropertyAction { target: wrapper; property: "GridView.delayRemove"; value: false }
}
完整的代码如下:
import QtQuick

Rectangle {
    width: 480
    height: 300

    gradient: Gradient {
        GradientStop { position: 0.0; color: "#dbddde" }
        GradientStop { position: 1.0; color: "#5fc9f8" }
    }

    ListModel {
        id: theModel

        ListElement { number: 0 }
        ListElement { number: 1 }
        ListElement { number: 2 }
        ListElement { number: 3 }
        ListElement { number: 4 }
        ListElement { number: 5 }
        ListElement { number: 6 }
        ListElement { number: 7 }
        ListElement { number: 8 }
        ListElement { number: 9 }
    }

    Rectangle {
        property int count: 9

        anchors.left: parent.left
        anchors.right: parent.right
        anchors.bottom: parent.bottom
        anchors.margins: 20

        height: 40

        color: "#53d769"
        border.color: Qt.lighter(color, 1.1)

        Text {
            anchors.centerIn: parent

            text: "Add item!"
        }

        MouseArea {
            anchors.fill: parent

            onClicked: {
                theModel.append({"number": ++parent.count})
            }
        }
    }

    GridView {
        anchors.fill: parent
        anchors.margins: 20
        anchors.bottomMargin: 80

        clip: true

        model: theModel

        cellWidth: 45
        cellHeight: 45

        delegate: numberDelegate
    }

    Component {
        id: numberDelegate

        Rectangle {
            id: wrapper

            required property int index
            required property int number

            width: 40
            height: 40

            gradient: Gradient {
                GradientStop { position: 0.0; color: "#f8306a" }
                GradientStop { position: 1.0; color: "#fb5b40" }
            }

            Text {
                anchors.centerIn: parent

                font.pixelSize: 10

                text: wrapper.number
            }

            MouseArea {
                anchors.fill: parent

                onClicked: {
                    if (wrapper.index == -1) {
                        return
                    }
                    theModel.remove(wrapper.index)
                }
            }

            GridView.onRemove: removeAnimation.start()

            SequentialAnimation {
                id: removeAnimation

                PropertyAction { target: wrapper; property: "GridView.delayRemove"; value: true }
                NumberAnimation { target: wrapper; property: "scale"; to: 0; duration: 250; easing.type: Easing.InOutQuad }
                PropertyAction { target: wrapper; property: "GridView.delayRemove"; value: false }
            }

            GridView.onAdd: addAnimation.start()

            SequentialAnimation {
                id: addAnimation
                NumberAnimation {
                    target: wrapper
                    property: "scale"
                    from: 0
                    to: 1
                    duration: 250
                    easing.type: Easing.InOutQuad
                }
            }
        }
    }
}
# 外形切换的代理
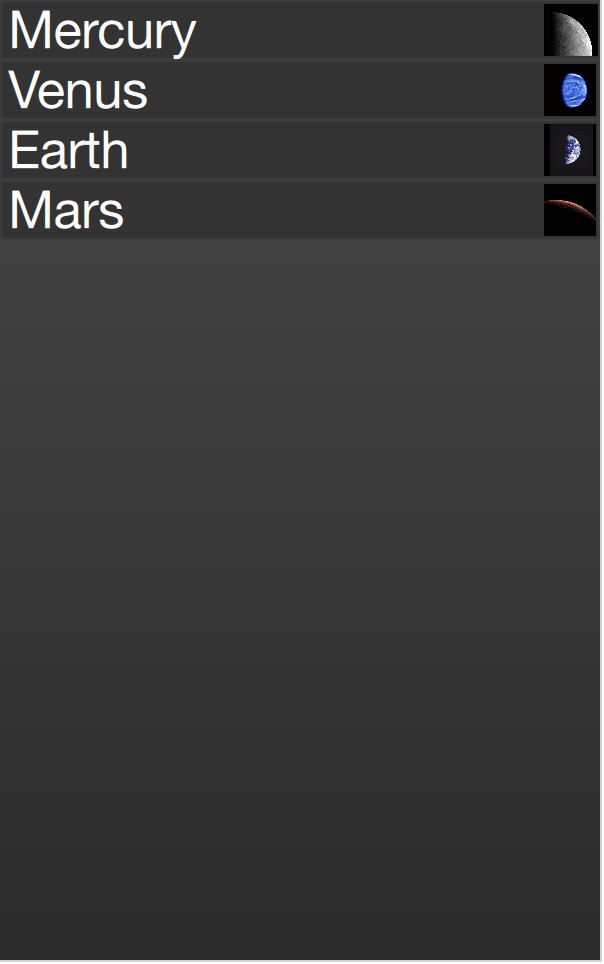
一个列表中的常用机制是当前项在被激活时展开。这可以用于动态地让项目展开填充屏幕以进入用户界面的新部分,或者可以用于为给定列表中的当前项提供更多信息。
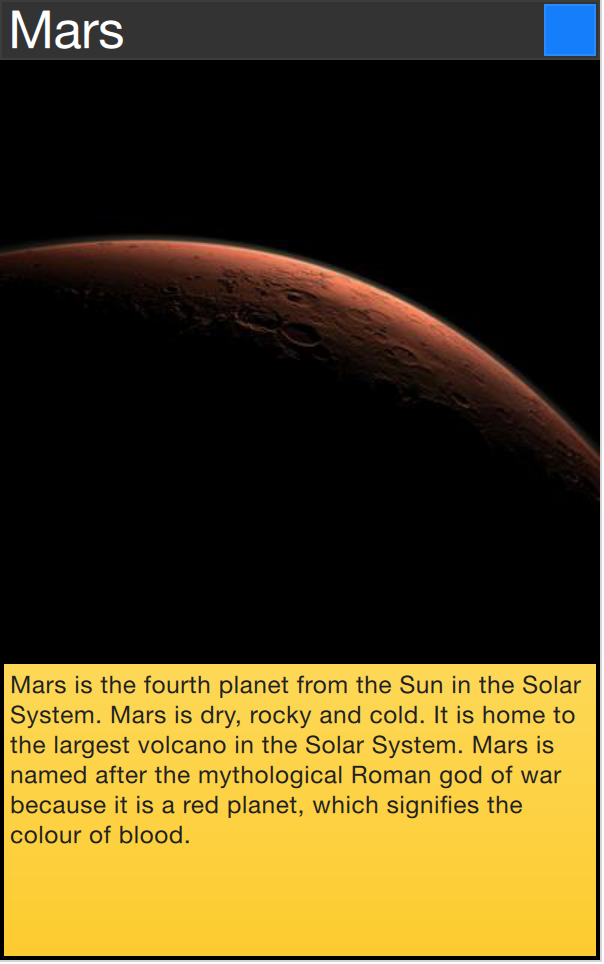
在下面的示例中,当每个项目在被单击时,都将自己扩展到包含它的ListView的整个范围。它的额外空间被用于添加更多信息。控制这一点的机制是每个代理项目都可以进入expanded(已扩展)状态,项目在这个状态展开。在这种状态下,许多属性发生了变化。
首先,wrapper的height被设置为ListView的高度;然后,将缩略图放大并向下移动,使其从小的位置移动到较大的位置。除此之外,两个隐藏的项,factsView和closeButton通过改变元素的 opacity属性显示出来。最后,设置ListView。
设置ListView涉及将contentsY(视图可见部分的顶部)设置为代理的y值。另一个更改是将视图的interactive设置为false,这可以防止视图移动,用户无法再滚动列表或更改当前项目。
当第一个项目被点击时,它进入expanded状态,导致代理项目填充ListView并重新排列内容。当关闭按钮被点击时,状态被清除,导致代理返回到之前的状态并重新启用ListView。译者笔记:其实关闭按钮一直都在,只不过是透明了,当其不可见时点击右侧上角的图形时候,也其实点击到关闭按钮上,只不过是看不见而已,触发的事件又看不出差异来,视觉上达到了关闭的效果。
import QtQuick

Item {
    width: 300
    height: 480

    Rectangle {
        anchors.fill: parent
        gradient: Gradient {
            GradientStop { position: 0.0; color: "#4a4a4a" }
            GradientStop { position: 1.0; color: "#2b2b2b" }
        }
    }

    ListView {
        id: listView

        anchors.fill: parent

        delegate: detailsDelegate
        model: planets
    }

    ListModel {
        id: planets

        ListElement { name: "Mercury"; imageSource: "images/mercury.jpeg"; facts: "Mercury is the smallest planet in the Solar System. It is the closest planet to the sun. It makes one trip around the Sun once every 87.969 days." }
        ListElement { name: "Venus"; imageSource: "images/venus.jpeg"; facts: "Venus is the second planet from the Sun. It is a terrestrial planet because it has a solid, rocky surface. The other terrestrial planets are Mercury, Earth and Mars. Astronomers have known Venus for thousands of years." }
        ListElement { name: "Earth"; imageSource: "images/earth.jpeg"; facts: "The Earth is the third planet from the Sun. It is one of the four terrestrial planets in our Solar System. This means most of its mass is solid. The other three are Mercury, Venus and Mars. The Earth is also called the Blue Planet, 'Planet Earth', and 'Terra'." }
        ListElement { name: "Mars"; imageSource: "images/mars.jpeg"; facts: "Mars is the fourth planet from the Sun in the Solar System. Mars is dry, rocky and cold. It is home to the largest volcano in the Solar System. Mars is named after the mythological Roman god of war because it is a red planet, which signifies the colour of blood." }
    }

    Component {
        id: detailsDelegate

        Item {
            id: wrapper

            required property string name
            required property string imageSource
            required property string facts

            width: listView.width
            height: 30

            Rectangle {
                anchors.left: parent.left
                anchors.right: parent.right
                anchors.top: parent.top

                height: 30

                color: "#333"
                border.color: Qt.lighter(color, 1.2)
                Text {
                    anchors.left: parent.left
                    anchors.verticalCenter: parent.verticalCenter
                    anchors.leftMargin: 4

                    font.pixelSize: parent.height-4
                    color: '#fff'

                    text: wrapper.name
                }
            }


            Rectangle {
                id: image

                width: 26
                height: 26

                anchors.right: parent.right
                anchors.top: parent.top
                anchors.rightMargin: 2
                anchors.topMargin: 2

                color: "black"


                Image {
                    anchors.fill: parent

                    fillMode: Image.PreserveAspectFit

                    source: wrapper.imageSource
                }
            }

            MouseArea {
                anchors.fill: parent
                onClicked: parent.state = "expanded"
            }

            Item {
                id: factsView

                anchors.top: image.bottom
                anchors.left: parent.left
                anchors.right: parent.right
                anchors.bottom: parent.bottom

                opacity: 0

                Rectangle {
                    anchors.fill: parent

                    gradient: Gradient {
                        GradientStop { position: 0.0; color: "#fed958" }
                        GradientStop { position: 1.0; color: "#fecc2f" }
                    }
                    border.color: '#000000'
                    border.width: 2

                    Text {
                        anchors.fill: parent
                        anchors.margins: 5

                        clip: true
                        wrapMode: Text.WordWrap
                        color: '#1f1f21'

                        font.pixelSize: 12

                        text: wrapper.facts
                    }
                }
            }

            Rectangle {
                id: closeButton

                anchors.right: parent.right
                anchors.top: parent.top
                anchors.rightMargin: 2
                anchors.topMargin: 2

                width: 26
                height: 26

                color: "#157efb"
                border.color: Qt.lighter(color, 1.1)

                opacity: 0

                MouseArea {
                    anchors.fill: parent
                    onClicked: wrapper.state = ""
                }
            }

            states: [
                State {
                    name: "expanded"

                    PropertyChanges { target: wrapper; height: listView.height }
                    PropertyChanges { target: image; width: listView.width; height: listView.width; anchors.rightMargin: 0; anchors.topMargin: 30 }
                    PropertyChanges { target: factsView; opacity: 1 }
                    PropertyChanges { target: closeButton; opacity: 1 }
                    PropertyChanges { target: wrapper.ListView.view; contentY: wrapper.y; interactive: false }
                }
            ]

            transitions: [
                Transition {
                    NumberAnimation {
                        duration: 200;
                        properties: "height,width,anchors.rightMargin,anchors.topMargin,opacity,contentY"
                    }
                }
            ]
        }
    }
}
此处演示的扩展代理以填充整个视图的技术可用于以更小的方式使代理项目改变形状。 例如,在浏览歌曲列表时,可以将当前项目做得稍大一些,以容纳有关该特定项的更多信息。